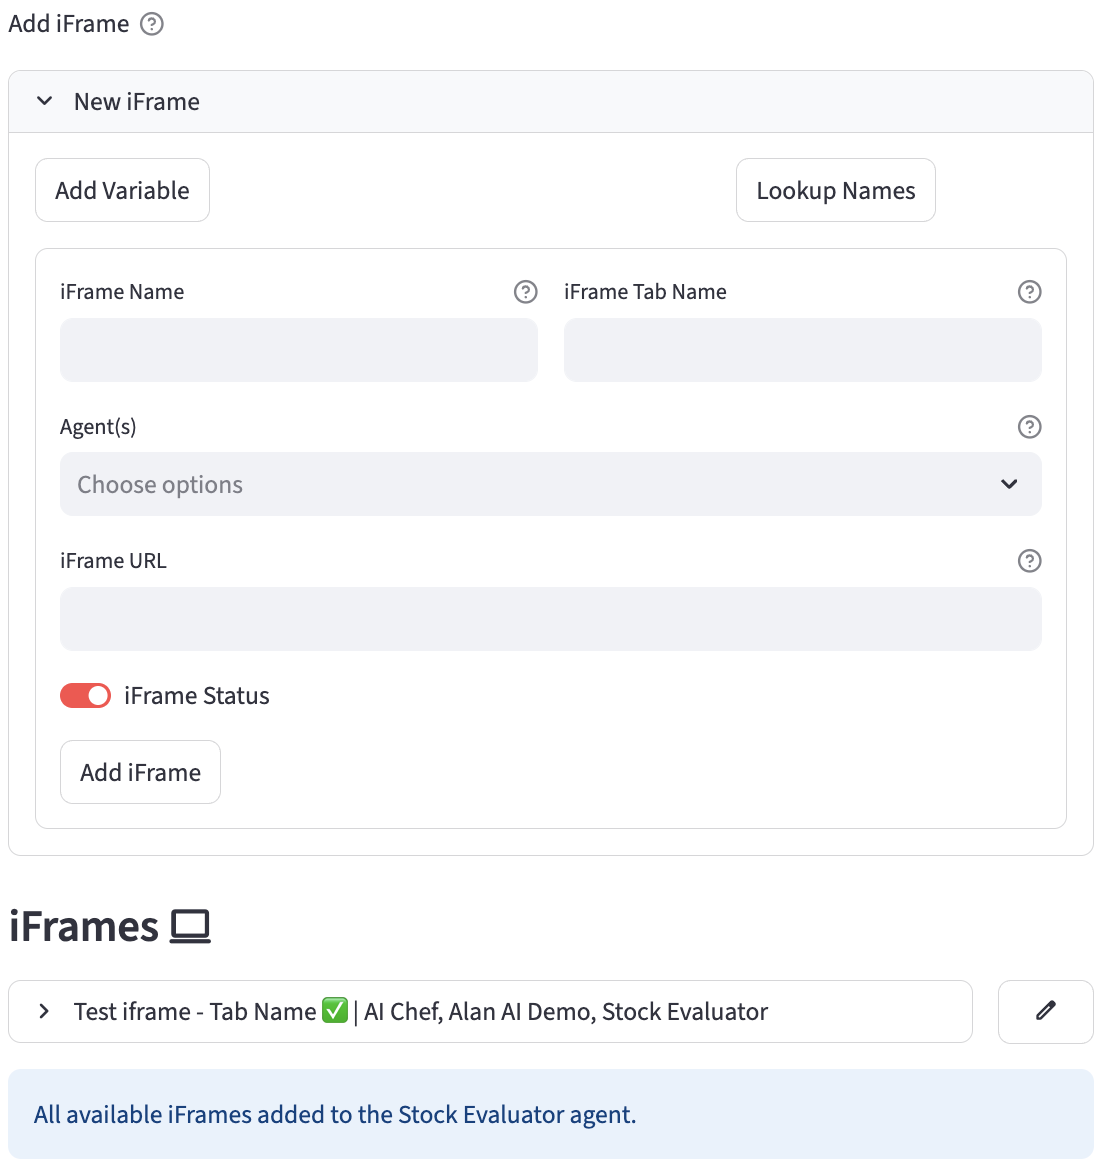
iFrames
The iFrames page in the application allows users to define and manage iFrames that can be displayed within the live agent interface. This enables agents to access external tools, knowledge bases, or other web-based applications directly within their workspace, enhancing their efficiency and access to information.
Overview
The page provides functionalities to:
- Add new iFrame configurations.
- List existing iFrames, filtered by the selected agent.
- Edit existing iFrame configurations.
- Associate iFrames with specific agents.
- Delete iFrames.

Adding a New iFrame
To add a new iFrame configuration:
- Navigate to the iFrames page.
- Expand the "New iFrame" section.
- A form will appear with the following fields:
- iFrame Name: (Text Input) A unique name for the iFrame (no spaces are allowed).
- iFrame Tab Name: (Text Input) The name to be displayed on the tab in the live agent interface.
- Agent(s): (Multiselect) Select one or more agents that will be able to use this iFrame.
- iFrame URL: (Text Input) The URL of the content to be displayed in the iFrame. Supports embedding variables (see "Variable Usage in URL" section below).
- iFrame Status: (Toggle) Activates or deactivates the iFrame. Default is
True(active).
- Click the "Add iFrame" button.
- Upon submission, the system stores the iFrame configuration in the database.
Listing iFrames
Existing iFrames are listed under the "iFrames" subheader.
- Filtering: The list is automatically filtered to display iFrames associated with the globally selected agent (if an agent is selected). If no agent is selected, all iFrames for the current account are listed.
- Display: Each iFrame is shown in an expandable section, displaying its name, tab name, status (✅ for active, ❌ for inactive), and associated agents.
- Details: Expanding an iFrame's section reveals:
- iFrame URL
- Each iFrame entry has "Edit" and "Delete" buttons.
Editing an iFrame
To edit an existing iFrame configuration:
- Click the "Edit" button next to the desired iFrame in the list.
- The "Edit iFrame" form will appear, pre-filled with the iFrame's current information.
- All fields from the "Add iFrame" form are available for modification.
- Click "Save Changes" to update the iFrame or "Cancel" to discard changes and hide the edit form.
Adding an Agent to an iFrame
If an agent is selected (via the global agent selector at the top of the admin interface), a section appears allowing you to associate existing iFrames (that are not already associated with the selected agent) to that agent.
- A dropdown lists "Available iFrames for [Selected Agent Name] Agent:".
- Select an iFrame and click "Include iFrame" to add the selected agent to that iFrame's
iframe_agentslist.
Deleting an iFrame
To delete an iFrame configuration:
- Click the "Delete" button next to the desired iFrame in the list.
- Confirm the deletion when prompted. The iFrame configuration will be permanently removed from the database.
Variable Usage in URL
The "iFrame URL" field supports dynamic content by embedding variables. The live agent interface is expected to substitute these placeholders at runtime:
- Session Variables: Use
{var['{variableName}']}or{var["{variableName}"]}to embed the value of a session variable. - Example:
https://crm.example.com/customer/{var["{customer_email}"]} - Example:
https://tools.example.com/details?phone={var["{customer_phone}"]} - Session ID: Use
{var['sessionId']}to embed the current session's unique ID. - Example:
https://analytics.example.com/session_report?id={var['sessionId']}
Ensure that the variable names used (e.g., customer_email, customer_phone) are defined and populated within the agent's session for the substitution to work correctly in the live agent view.