Intents
The Intents page in the application allows users to manage and configure intents for their AI agents. Intents are crucial for defining how an agent understands and responds to user input. They help in classifying user queries, collecting necessary information, and controlling the agent's behavior.
Overview
The page provides functionalities to:
- Add new intents. List existing intents with filtering options.
- Edit existing intents.
- Associate intents with specific agents.
- Delete intents.
- Utilize a JSON editor for complex flow configurations.
Helper Buttons
- Add Variable: Opens a dialog to create a new variable that can be used within your Required input, Intent Context Flow and Action Flow configurations.
- Lookup Names: Opens a dialog to look up the exact names of Prompts, APIs, MCPS, Parsers, Actions, etc., and Variables available for the selected agent.
JSON Flow Key Options - System Standards
When building Intent Context Flow or Action Flow JSON, you can use various keys to define the steps of the flow. Each key corresponds to a specific type of operation. The flow is executed sequentially based on the numeric order of the keys (e.g., "0", "1", "2", ...).
| Key | Description |
|---|---|
api |
Executes an API call. The value should be the name of the API to call. |
action |
Triggers a group of steps combined as an action. The value is the action name to be executed. |
mcp |
Invokes a Model Context Protocol (MCP) tools, functions or prompts. The value is the name of the MCP to use. |
parser |
Applies a parser to split data and assign them out. The value is the name of the parser to use for data transformation. |
merger |
Merges data into a variable using a merger. The value is the name of the merger to perform the data merge operation. |
script |
Runs a custom script. The value is the name of the script to execute. |
rule |
Evaluates a rule. The value is the name of the rule to be checked, which can alter the flow based on the outcome. |
delivery |
Sends data or a message using a delivery method. The value is the name of the delivery configuration. |
file |
Performs a file operation to read or write. The value specifies the file action to be taken. |
input |
Prompts the user for input. The value defines the input action, often used for gathering information from the user mid-flow. |
element |
Interact with pre-built element, like generating passwords, encrypting/decrupting variables and other mini-functions. The value is the name of the element to perform. |
intent |
Chains to a different intent. The value is the name of the next intent to be chain processed, ending the current flow. Often used for thank you, next tickle prompts. |
Example Flow
Here is an example of a simple action flow that uses some of these keys:
{
  "0": { "api": "get_customer_details" },
  "1": { "parser": "format_customer_address" },
  "2": { "delivery": "send_address_confirmation_sms" }
}
This flow first calls an API to get customer details, then parses the address from the response, and finally sends an SMS to the user with the formatted address.
Adding a New Intent
To add a new intent:
- Navigate to the Intents page.
- Expand the "New Intent" section.
- A form will appear with the following fields:
- Lookup Names: A button to open a dialog for looking up existing names of variables, prompts, APIs, etc., which can be useful when configuring flows.
- Intent Name: (Text Input) A descriptive name for the intent (e.g., "GetOrderStatus", "MakePayment").
- Intent Contains Search Word(s): (Text Input) Specific keywords from the intent name that help in uniquely classifying this intent from user input.
- Intent Status: (Toggle) Activates or deactivates the intent. Default is
True(active). - Agent(s): (Multiselect) Select one or more agents that will use this intent.
- Intent Type: (Selectbox) Defines the primary purpose of the intent. Options include:
action: For intents that perform tasks (e.g., API calls, script execution).information: For intents that generate data or content.input: For intents designed to collect specific data fields from the user.fixed: For intents that provide a static, predefined response.visual: For intents that might involve displaying images or visual content.- Variable: (Selectbox)
- For
inputtype intents: The variable where the collected user input will be stored. - For
actiontype intents: The variable whose value might be read and used by the action. - Privacy Level: (Selectbox) Sets the security/privacy context for the intent.
acceptable: Normal use. No authorization needed.private: Requires user validation/security checks. Will perform authorization for session, if already authorized, will not re-ask for authorization.highly private: Requires stepped-up security measures. Will perofrm authorization for session, and always re-authorize even if previously authorized.- Privacy Action: Action to execute to perform privacy steps or functions. To appear available for selection, the Action(s) need to be marked 'Use for Privacy' in the Action itself.
- Required Variable Inputs (JSON): (Text Area) A JSON object defining variables that must be collected from the user before this intent can be fully processed. The format is
{"input_variable_name": "Text prompt to ask the user for this variable"}. - Intent Context Flow (JSON): (Text Area) Defines the sequence of operations (prompts, MCPs, APIs, scripts, parsers, mergers, rules, file operations, or even chaining to another intent) for processing the intent. This is an example JSON object.
{ "preprocess": { "0": { "api": "get_customer_data" }, "1": { "parser": "customer_data_parser" } }, "subprompt": { "0": { "prompt": "clarification_prompt" }, "1": { "mcp": "weather_mcp_tool" } }, "subprocess": { "0": { "action": "update_crm_action" } }, "final prompt": { "0": { "prompt": "final_response_prompt" } }, "finalprocess": { "0": { "delivery": "send_summary_email" } } } - Context Flow Editor Button: (Button) Opens a dedicated JSON editor dialog for easier editing of the
Intent Context Flow. This button is located outside the main form but within the "New Intent" expander. - Fixed Response Message: (Text Area) Required if
Intent Typeisfixed. This is the static message the agent will respond with. Variables can be embedded using{var["variable_name"]}. - Preprocess for Privacy Actions:
preprocessand collectinginputscan be performed before privacy actions are executed. If you need variables or api lookups, etc. before embarking on aPrivacy Action, please make sure you have your preprocess actions configured. - For Action Intents:
- Intent Action Type: (Selectbox) Specifies the category of action (e.g., "journey", "twilio_call"). Populated from
Codesof typeaction_type. - Language: (Selectbox) Language for the action (e.g., "en-US").
- Delivery Method: (Selectbox) How the action's result or a message related to it should be delivered (e.g., "sms", "email").
- Intent Action Event: (Selectbox) A more specific event or sub-type for the action. Populated from
Codesof typeaction_event. - Action Flow (JSON): (Text Area) Defines the sequence of operations specific to the action itself (e.g., API calls, scripts, parsers).
- Action Flow Editor Button: (Button) Opens a dedicated JSON editor dialog for easier editing of the
Action Flow. This button is located outside the main form but within the "New Intent" expander.
- Action Flow Editor Button: (Button) Opens a dedicated JSON editor dialog for easier editing of the
- Action Response Message: (Text Area) An optional message to respond with after the action is completed. If left empty, subprompts and final prompts from the Context Flow might be executed. If provided, this is considered the final response for the action. Variables can be embedded.
- Click the "Create Intent" button.
- Upon submission, the system validates the JSON inputs and adds the new intent to the database.
Clicking "Create Intent" submits the form and adds the new intent to the database.
Listing Intents
Existing intents are listed under the "Intents" subheader.
- Filtering: You can filter the list of intents by
Intent Typeusing the selectbox above the list. - Display: Each intent is displayed in an expandable section, showing its name, type, status (✅ for active, ❌ for inactive), and associated agents.
- Details: Expanding an intent's section reveals:
- Search Word(s)
- Privacy Level
- Variable (if applicable)
- Fixed Response Message (if applicable)
- Required Variable Inputs (JSON, collapsed by default, click to expand)
- Context Flow (JSON, collapsed by default, click to expand)
- Action-specific details (Action Type, Action Flow, Language, Delivery Method, Action Response) if the intent type is "action".
- Each intent entry has "Edit" and "Delete" buttons.
Editing an Intent
To edit an existing intent:
- Click the "Edit" button next to the desired intent in the list.
- The "Edit [Intent Name]" form will appear, pre-filled with the intent's current information.
- All fields from the "Add Intent" form are available for modification. Additionally:
- Lookup Names: (Button) Available for looking up system names.
- Add Variable: (Button) Opens a dialog to quickly add a new variable if needed during intent configuration.
- Context Flow Editor Button: (Button) Opens a dedicated JSON editor for the
Intent Context Flow. This button is located outside the main form. - Action Flow Editor Button: (Button) Opens a dedicated JSON editor for the
Action Flow. This button is located outside the main form.
- Click "Save Changes" to update the intent or "Cancel" to discard changes and hide the edit form.
JSON Editor
For complex JSON configurations like Intent Context Flow and Action Flow, dedicated JSON editor dialogs are provided. These dialogs can be accessed via buttons next to their respective text areas in both the "Add Intent" and "Edit Intent" forms.
The JSON editor allows for:
- Viewing and editing the JSON in a raw text area.
- Loading the raw JSON into an interactive, tree-like editor for easier manipulation of keys, values, and structure.
- Adding new keys/values or items to objects/arrays.
- Deleting nodes.
- Copying the JSON content.
Adding an Agent to an Intent
If an agent is selected (via the global agent selector at the top of the admin interface), a section appears allowing you to associate existing intents (that are not already associated with the selected agent) to that agent.
- A dropdown lists "Available Intents for [Selected Agent Name] Agent:".
- Select an intent and click "Include Intent" to add the selected agent to that intent's
intent_agentslist.
Deleting an Intent
To delete an intent:
- Click the "Delete" button next to the desired intent in the list.
- Confirm the deletion when prompted (though the code doesn't explicitly show a confirmation dialog, it's standard practice). The intent will be permanently removed from the database.
Help - Intent Examples and Detail
The page includes an expandable "Quick Help - Intent Examples" section at the bottom, providing examples for:
- Required Intent Inputs Example: Shows the JSON format for defining variables that the agent needs to collect. OR if you want to order how inputs are collected, you can order them with the following numeric sort format:
- Context Flow example: Illustrates the structure for defining preprocess steps, asynchronous subprompts, subprocess steps, a final prompt, and final processing steps. The flow is executed in order: preprocess, subprompt, subprocess, final prompt, finalprocess.
{ "preprocess": { "0": { "api": "get customer" }, "1": { "parser": "customer map" }, "2": { "merger": "build fullname" } }, "subprompt": { "0": { "prompt": ["prompt_1", "prompt_2"] }, "1": { "prompt": "prompt_3" }, "2": { "mcp": "some_mcp" } }, "subprocess": { "0": { "action": "some_action" } }, "final prompt": { "0": { "prompt": "final_prompt" } }, "finalprocess": { "0": { "delivery": "stock report" } } } - Action Example Shows a sequence of operations for an action-type intent.
-
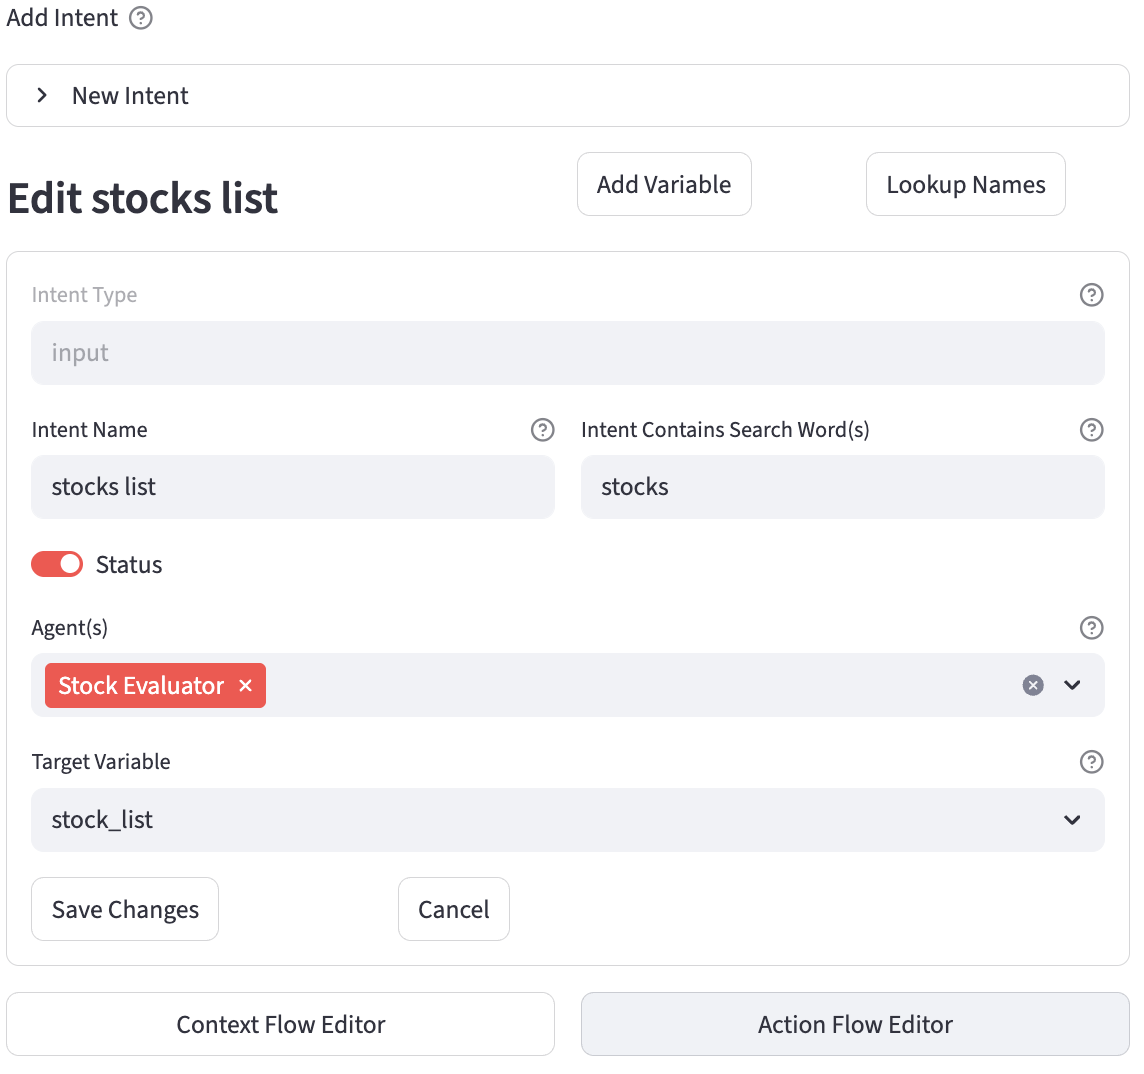
Intent 'Input Type': Example screenshot for an intent import type.

-
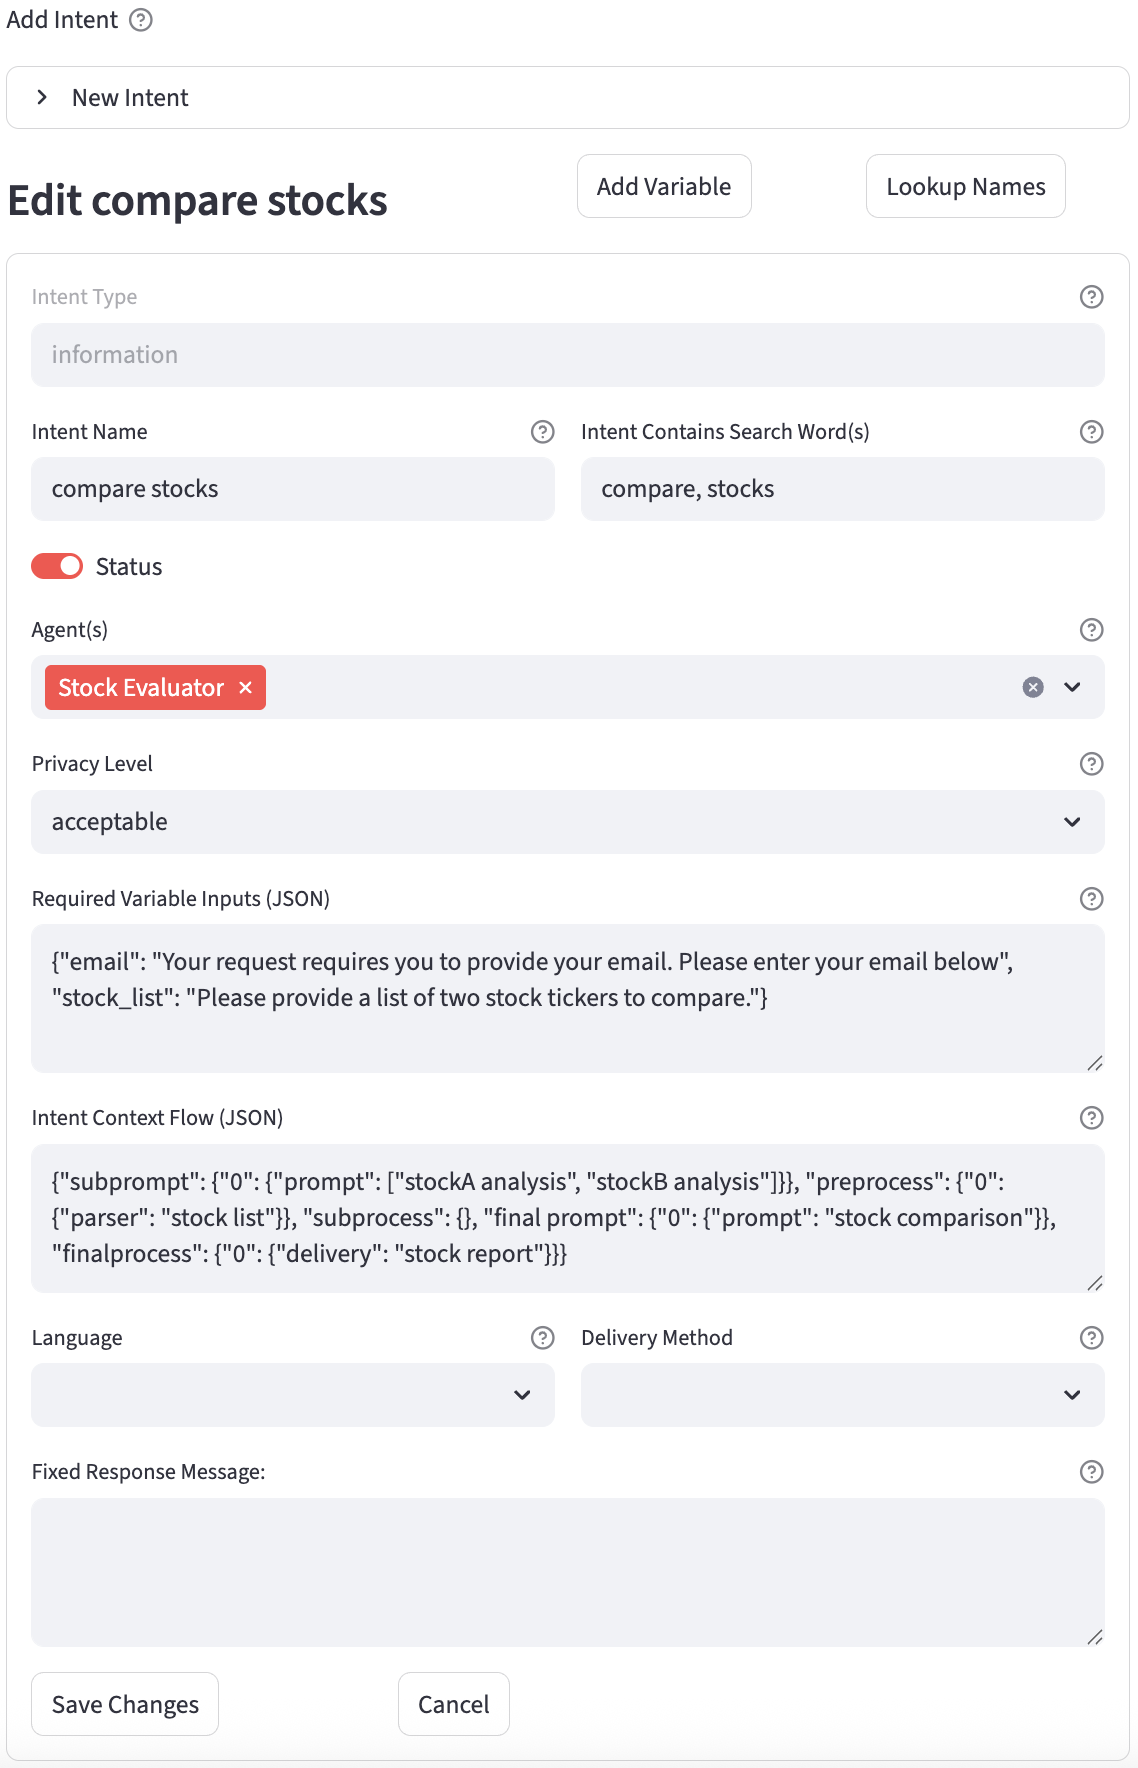
Intent 'Information Type': Example screenshot for an intent information type.

-
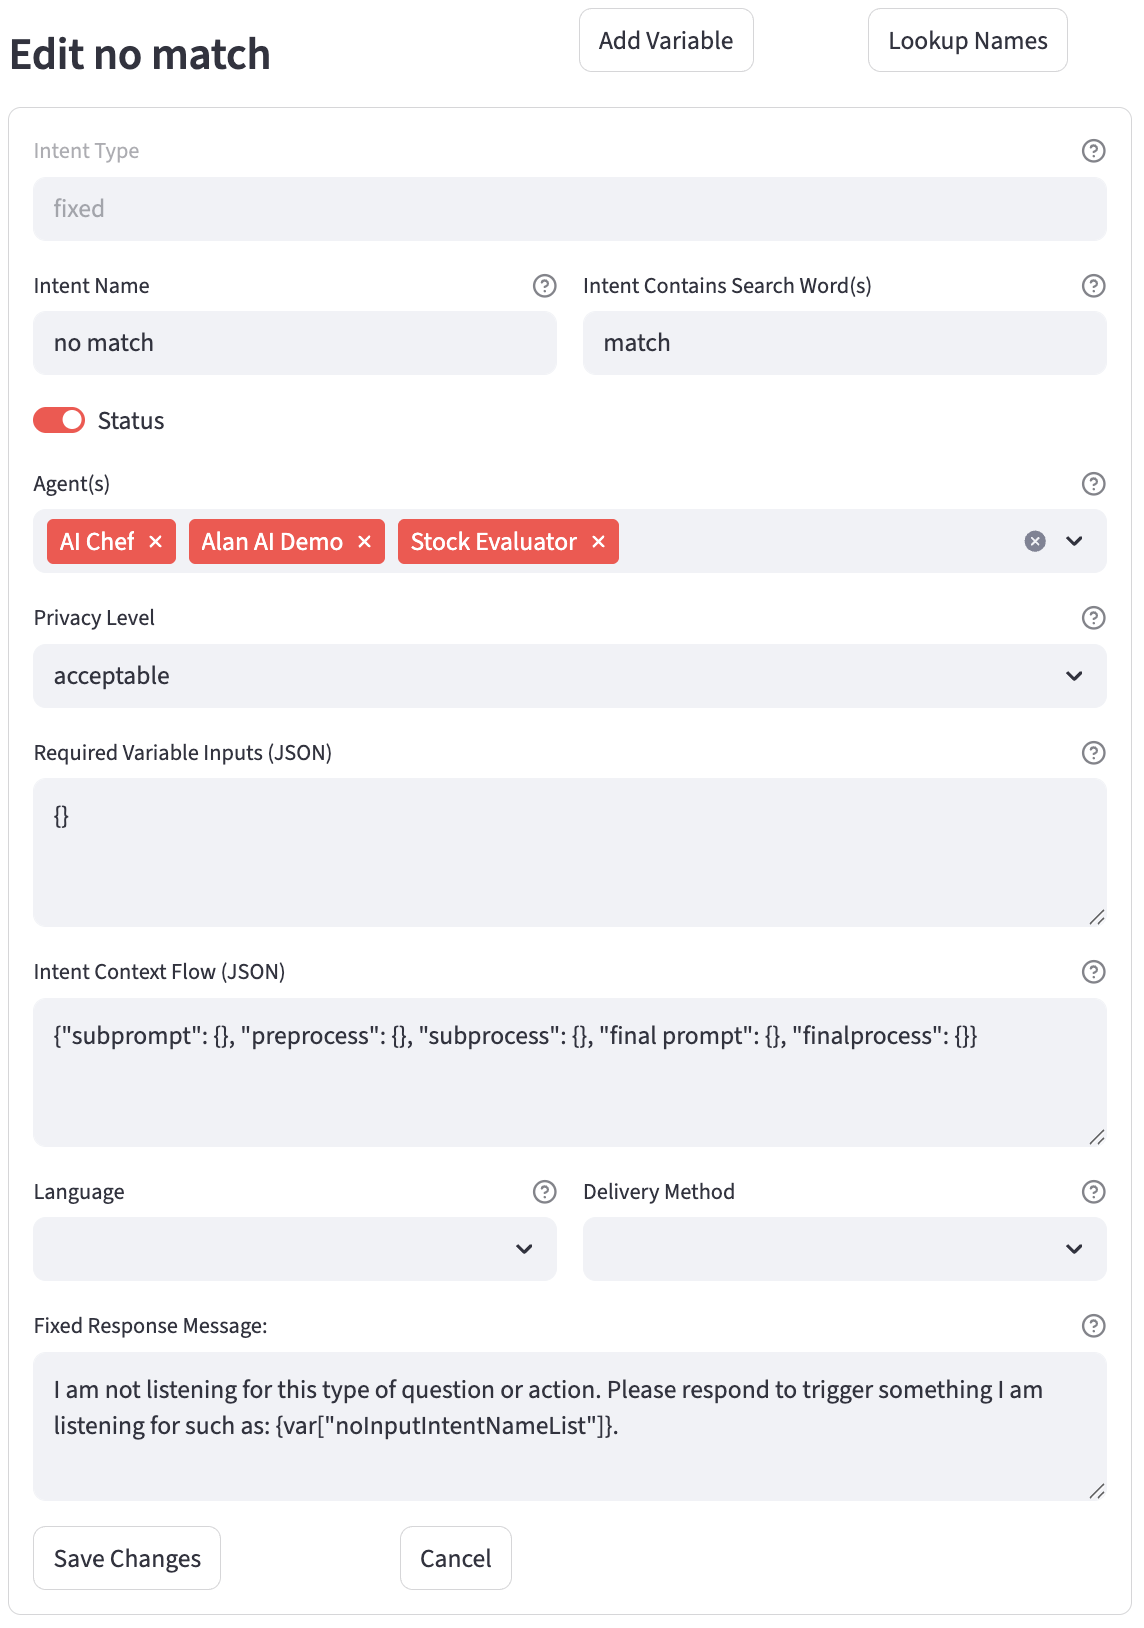
Intent 'Fixed Type': Example screenshot for an intent fixed type.
